Monday, May 29, 2023

TASFT Challenge #62 - Inspired by a Movie/Song or Tag or Birds


May has been challenging from a health perspective as I first got Covid and then my allergies went haywire so I haven 't been in my craft room as often as I would like. It feels good to get back to it. 

This challenge is all  about movies, songs, tags or birds.  I had multiple different ideas but decided to use something I haven't used before from my stash. I have personally challenged myself to go through aaaaalllll my dies and use ones I haven't before and decide on which are keepers. I have a lot of stuff in this craft room and it is time I used it! As well, I bought a hot foiling machine in April and being sick delayed my playing with it so here we go!

I chose to do a tag with a cool insert to hold a gift card. Gift cards are always appreciated by my 2 guys and nephews.  I cut out the frame and then added the layers for the front and the gift card insert.   I added a white panel inside for a personal message to the receiver.  I struggled with  where to put the TO/FROM. This is typically visible but I had put decorative paper on the outside and didn't think that the TO/FROM would go well there! I decided this is going to be a "hand directly to the receiver tag" or put the name on the back tag. This allowed me to play with my hot foil machine and create the JOY for the front of the tag.  This tag set (and the foil machine) definitely need some more hands on time.

TaDa! 


I couldn't get the gift card to close as nicely as I wanted so I added the ribbon and tied the little bow on it - the bow slides up and down the ribbon and keeps the tag closed :).

All the products are from my Stampin' Up stash with the exception of the hot foil.

Happy Crafting!

Saturday, May 6, 2023

TASFT Challenge #60 : Lots of Layers

 It has been a bit of a rough go in the Sanii house this past week.  I have been sick and have spent most of the last week in bed.  I am finally feeling better and have moved to my craft studio for some much needed craft therapy.  

For the current There's A Stamp for That challenge I chose the "Lots of Layers" theme.  Instead of paper, my layers are ink! I created this card as part of the classes for the Crop and Create March 2023 event - I am playing catch up as I away for the weekend that the event occurred.  

This is made using an embossing folder and matching stencils.  I am really enjoying these multi layer stencils.  Each stencil has opening for different parts of the design and you add different colours of ink on each of them.   I am a really big fan of flowers so had a great time playing with this one. This set is from the company Altenew. 


The kit we received from Altenew contained the embossing folder, a 4 piece stencil set and this beautiful stamp set.  The idea is you can either stamp or emboss and then "colour" the arrangement using your favourite medium or with the stencils. While the stencil has 4 pages, some of them actually have 2 different groupings to be stenciled so you end up doing 6 layers here.  While that sounds like a lot it really goes amazingly fast after you learn how to use it.  There is also an awesome instruction sheet with examples so remind you how to use the stencils. Such fun!


P.S. Sorry for the weird photo of the supplies - it is amazingly difficult to take a picture of a stamp set due to the plastic sheet they are attached to! Something to work on in the future.

Happy Crafting!


Monday, April 17, 2023

Challenge # 59 - Flowers / Anniversary / Squares

 I like this challenge as I am a big fan of flowers on cards! I say that and then I realize that it has been quite a while since I have dug through my flower stamps and made cards.  Maybe the weather today is spurring on these thoughts:

April Showers, Bring May Flowers...

πŸŽ•πŸŽ•πŸŽ•πŸŽ•

It is raining today but I am I think my crafty time yesterday has got me going and excited about getting some crafting done.  I have to laugh about this because I will admit yesterday was a difficult slog in the craft room! I kept misplacing items, the ink colours I used were a bit off from what I wanted my cards to look like and I was definitely challenged on my die cutting.   I persevered and finished up the  Taylored Expressions class from the March Crop and Create for this week's challenge.  I adore these little flowers and can't wait to play more with these supplies.  


The cards were made using a stamp and a 4 layer stencil set - yeah 4 layers - and a matching die set for the little flower dies. Lots of inking but I love the end result.  I really want to make these with a yellow and coral mix next.  The kit from Taylored Expressions was amazing! The stencils come with a large rubber stamp that creates the stems and then you use the stencils to build the flowers and leaves.  We also received a sentiment and matching die set.  These are going to get lots of use! 

Supplies:

  • Taylored Expressions : Buds & Blossoms Stamp & Stencil Combo, Sentiment Staples Clear Stamp, Sentiment Staples Coordinating Dies. Little Bits – Buds & Blossoms Dies
  • Ink: Stampin' Up Real Red, Blushing Bride, Pretty in Pink, Calypso Coral, Mossy Meadow, Mint Macaron
  • Dr. PH Martin's White Acrylic Paint for splatter

And another one: 


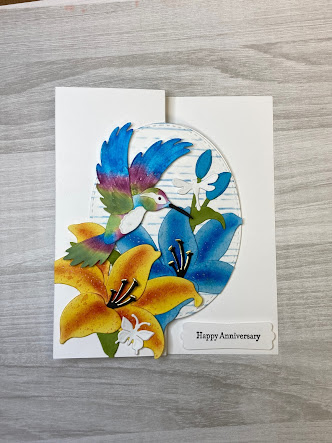
I  made the card above for my in-laws anniversary and thought it would be perfect for this challenge as well.  This card is from a Spellbinder class where we received the dies,  a stencil and a sentiment set (not used on this card) and then there was a class where we created 3 cards using the products.  My in-laws love birds and flowers so I thought this one was perfect for them. The supplies are from the Bibi's Hummingbirds Collection.  

Supplies:

  • Spellbinders: Hummingbird and Lily Etched Dies and Hummingbird Textured Stencils. 
  • Gold Glitter Pen  
  • Inks: Tim Holtz Distress Oxides - I winged this based on what I had and what I thought would go with the paper.
  • Sentiment Stamp from a very old and favourite Stampin Up set - Teeny Tiny Wishes
Happy Crafting!

#cropandcreatedelivered
#spellbinders

Sunday, April 16, 2023

Catching Up


Sorry, I have been MIA for a bit. I have to confess that my crafting mojo has been a bit absent lately.  I haven't done any Christmas cards in months - so NOT me! I think I may have overdid it in January and then I needed a break.  I have been keeping up with my There's A Stamp for That Challenge cards so I thought I would share here with you!


I created a Clean and Simple card for Challenge # 56.  Can't wait to share with my bestie:

For the Easter theme in Challenge #57, I originally planned to have a bunny silhouette but then I just had to use this cross and sentiment.  


For challenge #58, I pulled out my class from the March Crop and Create event for the OWL theme.  To be honest, these owls are a bit too realistic.  My favourite is the "white" one.  Can't wait to play more with this set.


This is my April monthly Challenge submission.  A cute, simple spring card.  I was dreaming about spring as it was a grey, gloomy morning and was hoping to inspire Mother Nature to give us some sun.  


Monday, February 20, 2023

It's All About the Boys for Challenge #55 today

 For today's inspiration post in the There's A Stamp for That Facebook group, I chose to focus on the boys prompt.    I have been wanting to play with this die set and so I dug it out, cut out the monitor and then created a Nintendo controller which you will notice is totally absent from the card! I had an idea in mind and when I was part way through I realized it wouldn't work the way I wanted it to so I changed directions and created the switch controller instead. I then coloured up this cute guy  from a Sweet Sentiments stamps set with my markers.  I stuck to my favourite red combo - R59/29/24 and blue - B29/26/24/21.


To assemble, I stamped the Happy Birthday directly on the card base and  I added vellum to the monitor to make it look realistic.  I did the same with the Game On! and the screen on the controller.  Those little stamps are very finicky!  Then I assembled it all.  

I have to confess that I don't know the name of the die set or the stamp set.  I have had the die for a loooong time and the stamp set doesn't have the name of the stamp sheet and is no longer on the Sweet Sentiment website.  I will keep looking for the details.  The Game On was stamped with a tiny letter set I got from the dollar store years ago.  The Happy Birthday is from the  Yay! Birthday Bundle from Hero Arts.

Happy Crafting!


Friday, February 17, 2023

TASFT Challenge #55 and Monthly Fairy Challenge


Danni has declared it Fairy February so I needed to get in on this challenge! The latest bi-weekly challenge has boys so my goal was to cover both with this card! 

This card is filled with Kraftin' Kimmie goodness.  The house is from the Fairy Village! set, the fairies are from the Fairy Folk! set and sentiment is from the Life is a Joy! set. 

How I made this card: 
I stamped the house first and then I coloured in the sky. I used alcohol on a piece of fluffy material to mottle the blue sky.  I then coloured in the grass.  Next I coloured the fairy house and fairies. I fussy cut the fairies. I then added the sentiment to the background and popped the fairies up with some foam tape and added them to the card.  Last but not least, I used a glitter Jelly Roll pen to colour the wings and added trios of the pen throughout the sky to look like fairy dust! 

What I used:

    Stamps: Kraftin' Kimmie Fairy Village!, Fairy Folks!, and Life is a Joy!

    Ink: Memento Tuxedo black ink

    Copics:

        Sky: BG000

        Grass: G99, YG67, YG63

         Stump: E29/27/25/23/21

        Window: Y11

        Door: E49, R59/29/24

        Moss: YG17/25/11

        Mushrooms:  R59/29/24 and W3/1/0

        Girl Fairy Dress: R29/24/20

        Boy Fairy Clothes: R59/29/24

        Skin: E04/11/21/02/00 and a kiss of R20 on the cheeks

  Other products:  alcohol, sherpa fabric swatch, Jelly Roll Glitter pen


Happy Crafting!


Birthday Wishes

 One of the crafting groups that I am a member of is the Creative Scrapbooker VIP (Village of Inspired People) group.  They sponsor monthly crops and different events within the group each month.  For a nominal monthly free, you can participate in all the events.  

One of the items they have is an Angel VIP birthday card project.  You can add your name to the group to receive cards and you can send cards to anyone on the list.  It is a fun thing to do as well as receive and is completely optional.  

Well, I cannot believe the beautiful birthday cards I received! They started arriving a few weeks ago and I set them all aside to open this morning.  Wow, talk about beautiful.


Here is the stack of them!


Here are the beautiful cards:


They are all now on the fireplace mantel where I can enjoy them.

If you are interested in the VIP group, details can be found here.


Happy Crafting!

It has been too long!

 Wow, I can't believe I haven't posted since January 23rd!  I was sick for a bit and that really wiped me out for a bit. I am now back at it!

I am finding that there are soooo many events happening in the first quarter.  I did some Cricut courses virtually and some courses about turning your crafting into a business.  There is a card making summit coming up in the next few weeks and more.  Wow, I never realized that there were soooo many events.

Here are some pictures of some cards that I did in the past few weeks.  One of the things that I did while sick was make a list of the classes and projects I have that need finishing and I my goal is to work through them all this year!

I started with the Crop and Create Fall 2022 Cardmaking event.  I had some classes that I wanted to get done...before the next Crop and Create in March! I am happy to say I finished them up this week.  I used the cute balloon ones for one of the challenges on the There's A Stamp for That facebook group.


I have also been busy with my Mixed Media classes.  We have had 1 session where we play with our supplies and then 3 classes.  Here are my creations:

Here we used resist and scribble crayons to colour around the circle.  I stamped the butterflies on some paper from our kit and then fussy cut them out.  We added texture and ink with stamps to the background before adhering the butterflies.  I really like how this turned out. These classes are all about going outside of my comfort zone and trying new things.  I did make a mess when I tried to stamp the sentiment across the 2 pages but a few layers of gesso, some white paint and scribble crayons hid my booboo!  


Playing with texture and colours I typically wouldn't use and adding outlines to see how the mediums work.  We used stencils in this class for the shapes and some rice paper sayings for the sentiments.  I added the heart stamp to balance out the page.


A single page layout! We used a heart stencil and stencilled with iridescent medium (think shiny), acrylic paints and then finally scribble sticks (faint hearts in background).  The saying is a rice paper sentiment. 

I think that is it! Crafting is a great way to spend the evenings and weekends during the winter.

Happy Crafting!


Monday, January 23, 2023

TASFT Inspiration Monday

 Today my inspiration post was based on the January Sketch.   Here is the original sketch provided:


Here are my interpretations of the sketch:


  My nephew and his wife and my niece and her hubby are expecting. Two new little ones joining the family this coming spring.  They both typically choose non-traditional colours so I thought these would be great for them.  Oh, and the bi-weekly prompt includes polka dots so I have that covered too!  My sentiments were a bit too long to go on the location shown above so I improvised and put in the upper corner.

I played around with my Copics to create a colour combo I felt went with the papers.  

Stroller card:
Copics Used: R08, R05, R02 for heart balloon, BG78/75, E08, YR18 for the stroller, C0/00 for shading, C3/1/0 for wheels
Papers: Stampin' Up Calypso Coral, SU DSP (name unknown)

Elephant card:
Copics Used: R08/05 for hearts, C3/1/0 for elephant, C0/00 for shading

Happy Crafting

Saturday, January 21, 2023

How I created my Spin card


As promised, here are the instructions on how I created my spin card.  I had a fun time figuring out and making this card.  Here it is again: 


And here she is in action:


To create this card, I needed to mirror the image of the skater. To do this, I used mirror stamping. This uses a solid image stamp to transfer the image to and then you use this to stamp the mirror image on your paper.  Here are a few great videos from Jennifer McGuire showing how to do the technique:

Mirror stamping: check out this video

Mirror stamping with a stamping platform: check out this video 

My mirror stamp is an old rubber one and I wasn't fully happy with the image I got so I think I will play more in the future with Jennifer's acetate idea. I loved her idea of just using a solid stamp from your stash - I will have to see if I have one! In the end, I ended up tracing over the image with a black Copic Multiliner to make it more sharp.  Once I stamped the 2 images, I coloured them up with my copics, cut out 1 and then laid the 2 images together and cut out the 2nd one to match. This was a bit tricky - to do this, I cut close to a few spots on the 2nd image and then lined them as close as I could.  I wanted my skater to have a little bit of ice under her so I cut out an oval from white paper and covered it with Glossy Accents to make it look like ice.  Once this was dry, I took some thread and a needle and threaded it through the middle of the oval. 

 I created my background and added the sentiment and lightly tacked it to my card front. I positioned a circle die over the front where I wanted it and cut out the 2 layers at  the same time.  I removed the front panel and using the thread from above I laid down one of  the skater images upside down and positioned her where I wanted her in the circle above the oval.  I then adhered some thread to the top of the circle on the card base, across the back of my image and on the bottom of the circle on the card base using strong sticky double sided tape. I then added the 2nd image onto the first.  I attached the front panel and decorated it with the little bird from the stamp set and the Krafty dots.  To make sure the ice oval didn't drop, I added a drop of clear drying glue under the oval on the string. I let this dry with the oval being flat so it would flip down when the card was opened.   

I created an inside panel to match the front one as a plain white background was too stark.  To get her to spin, you simply rotate her a few times and then close the card and tilt the ice as seen in the first picture above. When the recipient of the card opens it, she will do a beautiful pirouette!  

Purples : BV08, BV17, V17, V15

Earth: E09, E08, E07

Cool Greys: C0, C1

Black Copic Multiliner SP size 0.35

Stamps : Kraftin' Kimmie Skating Friend, reverse stamp

Kraftin' Kimmie dots


Kraftin Kimmie January Saturday Challenge #664 - Mid Month Inspiration

   Good morning and welcome to our  

Monthly Saturday Challenge Mid Inspiration Post

We are back today with an inspirational post showcasing more ideas to inspire you and help get your creative juices flowing!
We can't wait to see what you create!

This month the challenge themes for you are: 

WINTER,

BLUE,

or

MONOCHROMATIC


You can choose any or all - whatever inspires you!


Krafty Girl Rosie is hosting the mid-inspiration post today!


Every month we post a brand new challenge with three themes to choose from, and a mid month inspiration post with even more creative ideas! You are welcome to enter as many times as you like.

This month's challenge will remain open until February 3rd!

For this challenge,  I came up with a Winter interactive card.  Background:  During Karla's live earlier this month, I mentioned how the little skater from the Skating Friends stamp set made we think "Tada!" so I set about creating a "Tada" card:  


And she spins! 


Details on how I created this card will be posted in my next post.

These must be new creations and you are welcome to use any stamp, however, using Kraftin' Kimmie Stamp products will earn you double entries!

The monthly prize is a $25 voucher to the Krafty shop!!!
Woohoo!  There are two ways to enter: you can link up your creation on the  Kraftin’ Kimmie blog page and if using KKS products,
you can upload your photo to the album in our 

And don't forget about this weekend's Frugal Friday Specials!! 
We've got a selection of gorgeous stamp sets on SALE 40% OFF this weekend while supplies last!!  


Be sure to check out all the fun projects the Design Team has come up with in the links below! Happy kraftin'!

Thursday, January 19, 2023

An Otterly Fun Card

  One of the  prompts for the group "There's A Stamp for That" in the current challenge is to use Otters.  I used the adorable From the Other Side from Kraftin' Kimmie to make this fun mini slimline card.

I pulled out my mini slimline dies and cut out a panel.  I used a stencil to create the water waves with Mermaid Lagoon Distress Oxide Ink. I used the same to blend in the water.  I then created a mask and blended 3 different colours to create the sky(Fossilized Amber, Spiced Marmalade, Fired Brick).  I love the way the sky came out!  I stamped the sentiment directly on the background with Memento Tuxedo black ink. 

I then coloured up the otters with Copics (E29, E27, E25, E23, E21, E49 for the nose), fussy cut them out and mounted them on the panel on foam pieces.  I then used the next level of the mini slimline set to create the black mat and mounted it all on the card base. A relatively quick card but the colours are beautiful!


Kraftin' Kimmie A-dough-able Stamp of the Month!

 Ever make a project and think you can do better?  That is how I felt when I made my original card using this set. I challenged myself to create using purple which is not a colour I use often.   So over the last few weeks I have been thinking and Pinterest cruising and came up with a few more ideas.  One was the fun Valentine I posted on Saturday and the next is this one:


I created a square 4.25 x 4.25 base and then added a pink mat and a white base layer.  I stamped out the donuts on Hammermill paper with Memento Tuxedo black ink and went to town colouring them with my copics.  I just pulled markers and played until I found combos I liked together!  I was having so much fun doing this that I totally forgot to write down the combos. I really like them too so am a bit ticked at myself! 

I then used my ScanNCut to cut out the donuts and then a die to cut out the center. Once I had them done, I layered them on the base, added the sentiment but something was missing. I added the hearts and that finished it off for me!  What do you think?

Copics Used: ????
Stamp Used: A-dough-able Stamp of the Month from Kraftin' Kimmie (January 2023)
Paper: White - Hammermill, Pink - Stampin' Up Melon Mambo
A random little heart punch from my stash with SU Real Red paper

You can see my Pinterest inspiration for this card here


Wednesday, January 18, 2023

Kraftin Kimmie January New Release Instagram Hop!


It's time to hop on Instagram with Kraftin' Kimmie to celebrate the January 2023 Release!! After you leave here head on over to Instagram and start the hop at @kraftinkimmie or on my Instagram @janetanii.

I had an awesome time playing with the new Krafty Tools Layering Stencil! It can be used as a background or on its own as I did below:   


Happy Hopping!


Sunday, January 15, 2023

Kraftin' Kimmie January Hop and Shop

  Woohoo!!!

Today we are celebrating all the new fabulous goodies in our January Release that are NOW available in the

 Kraftin' Kimmie Stamps Shop!


and we're excited to share it ALL with you in a fabulous krafty HOP!

So let's check everything out as we hop around the Krafty Design Team's blogs today!  Grab a drink, sit back and relax while we take you on a krafty tour!


For today's project, I used the new Geo 1 stencil on my background and the adorable Krafty Mice! stamp set :


First up we have an adorable addition to our mice friends,
designed by Sabrina van Vlotten
 and it's called.....


Next, is a wonderful creative krafty set by
artist Michelle Houghton
 and it's called.....

KRAFTY GOODNESS!


Third, we have a funny, punny food set 

by artist Michelle Houghton called...

SO PUNNY!


We've got TWO new Krafty Stencils for this month's release to help add some funky flair to your creations!  

They are called....

GEO 1 STENCIL


(a 2 piece layering stencil!)


And don't forget our awesome Stamp Of The Month!! We have the very cute You’re A-Doughable stamp, which is FREE with your order of $75 or more before shipping/tax!  (while supplies last!)


Now head on out on today's celebration blog hop and check out all the new products in action as the Krafty Team shares their incredible designs!  Then jump on over to the Kraftin' Kimmie Stamps shop and grab some of these fabulous goodies for yourself!

Happy Krafting!


PS. You can see everything up close in the Live Release Replay on Facebook!!


Saturday, January 14, 2023

January Krafty Peeks... Day THREE! So Punny!


   Today is our final day of Krafty Peeks for the January Release 

 at Kraftin' Kimmie Stamps!


We are so excited to share a funny, punny set 

by artist

Michelle Houghton called...

SO PUNNY!


This set is filled with adorable images and sweet puns - perfect to send to a friend anytime! And think about how cute they would be for Valentines Day!! πŸ’“You can even add little faces for even more fun!

I made this monochromatic birthday card for my pun (and olive but not pimento) loving kiddo using the Olives and the "Olive you so much" sentiment.    

Next, I made some Valentine's Day cards since I live with some pun lovin' guys:


You'll notice this awesome set coordinates with the YOU'RE A DOUGH-ABLE stamp of the month set! 


The free stamp of the month needed one too!

Check out SO PUNNY in so many amazing creations today as you hop around the Krafty Team's blogs!  You'll also see the beautiful new stencils, GEO 1 and KRAFTY TOOLS (a layering stencil!!) along the way! 


Everything will be released after our LIVE Online Release Party TODAY!  All the fun takes place in the Krafty Friends facebook group beginning at 2 pm ET!  See you there!

*Be sure to join us for our Live Release Party as one lucky Facebook commenter will win Krafty $'s!!


Friday, January 13, 2023

January Krafty Peeks... Day TWO! Krafty Goodness!

 Welcome back to Day TWO of our January Krafty Peeks!

Are you excited about what you've seen so far!?  Are you ready for more?

I hope your answer was yes because we've got more fabulous fun for you today!


The stamp set we are 'peeking' for you today is from 

artist Michelle Houghton
 and it's called.....

KRAFTY GOODNESS!


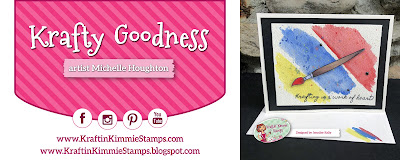
This adorable set features an assortment of creative Krafty supplies ready for you to make amazing works of "heart"! 


I used the Geo 1 stencil to create my background and stamped the sentiment "glitter" all over. I then coloured up the paint brushes using my Prismacolor pencils. I cut out a paint palette and edged it to match the background and then added stickles in Hibiscus, Mermaid Tail and Sea Glass.  I added these to the ends of the brushes as well and then mounted them on the card. 

 Check out KRAFTY GOODNESS and our new stencils in so many awesome creations today as you hop around the Krafty Team's blogs!  


You'll see more of our January goodies all week, and then everything will be released after our LIVE Online Release Party on Saturday at 2 pm ET in the Krafty Friends facebook group!  

*Be sure to join us for our Live Release Party as one lucky Facebook commenter will win Krafty $'s!!


For now, check out all the fantastic goodness in today's hop!
See you tomorrow!

Thursday, January 12, 2023

January Kraftin' Kimmie Release Day 1!

 Who's ready for lots of brand new Krafty goodies?!

It's time for our January Release Peeks to begin 


Today we’re featuring an adorable addition to our mice friends,
designed by Sabrina van Vlotten
 and it's called.....
KRAFTY MICE!


These sweet little mice friends are back with their  creative supplies and ready to get krafty!!

I used this awesome set to create this pop-up card.  Aren't they adorable?! They are really fun to create with.

As you hop around the design team's blogs today you'll be able to check out KRAFTY MICE! in action in combination with a lot of our other new 
January Kraftin' Kimmie products!  

We've got TWO new Krafty Stencils for this month's release to help add some funky fun to your creations!  

They are called....
GEO 1 STENCIL


and KRAFTY TOOLS
(a 2 piece layering stencil!)

Both designs are perfect for all your cards, scrapbook pages, mixed media and more!


You'll get to see all of our brand new goodies in action over the next few days of the January Krafty Peeks and everything will be released at our LIVE Release Party 

on  Saturday, January 14th at 2 pm EST in the Krafty Friends group! 

*Be sure to join us for our Live Release Party as one lucky Facebook commenter will win Krafty $'s!!


For now, hop around and check out some amazing creations from the Krafty Team! Our fabulous designers can't wait to share their inspiration with you!

Come on back tomorrow for some more krafty fun and goodness!