Today my inspiration post was based on the January Sketch. Here is the original sketch provided:
Happy Crafting
Today my inspiration post was based on the January Sketch. Here is the original sketch provided:
Happy Crafting
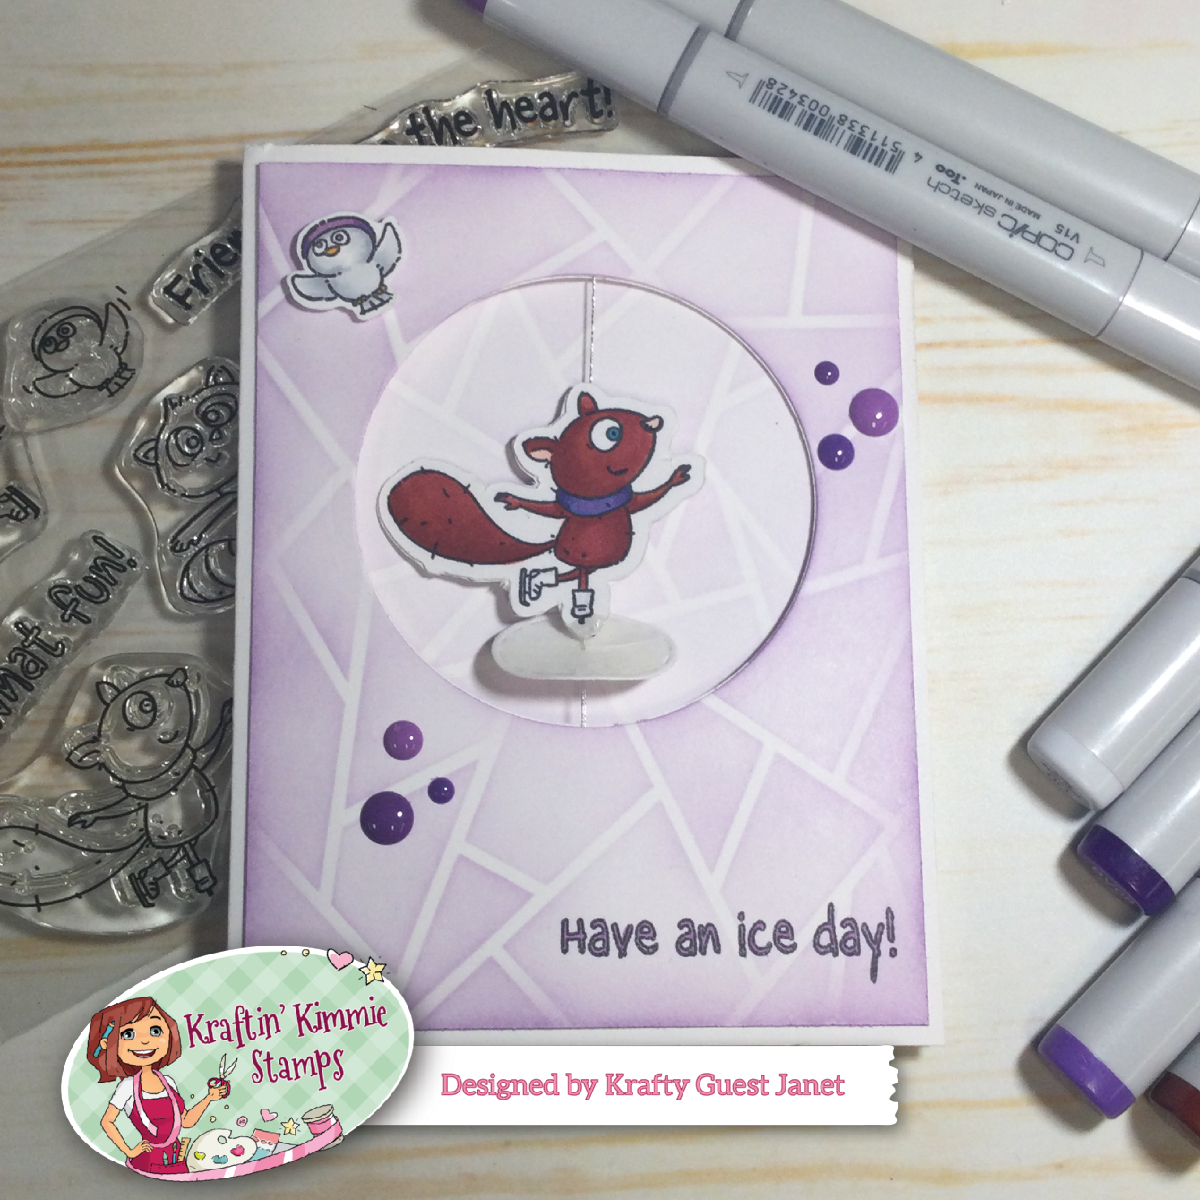
As promised, here are the instructions on how I created my spin card. I had a fun time figuring out and making this card. Here it is again:
And here she is in action:
To create this card, I needed to mirror the image of the skater. To do this, I used mirror stamping. This uses a solid image stamp to transfer the image to and then you use this to stamp the mirror image on your paper. Here are a few great videos from Jennifer McGuire showing how to do the technique:
Mirror stamping: check out this video
Mirror stamping with a stamping platform: check out this video
My mirror stamp is an old rubber one and I wasn't fully happy with the image I got so I think I will play more in the future with Jennifer's acetate idea. I loved her idea of just using a solid stamp from your stash - I will have to see if I have one! In the end, I ended up tracing over the image with a black Copic Multiliner to make it more sharp. Once I stamped the 2 images, I coloured them up with my copics, cut out 1 and then laid the 2 images together and cut out the 2nd one to match. This was a bit tricky - to do this, I cut close to a few spots on the 2nd image and then lined them as close as I could. I wanted my skater to have a little bit of ice under her so I cut out an oval from white paper and covered it with Glossy Accents to make it look like ice. Once this was dry, I took some thread and a needle and threaded it through the middle of the oval.
I created my background and added the sentiment and lightly tacked it to my card front. I positioned a circle die over the front where I wanted it and cut out the 2 layers at the same time. I removed the front panel and using the thread from above I laid down one of the skater images upside down and positioned her where I wanted her in the circle above the oval. I then adhered some thread to the top of the circle on the card base, across the back of my image and on the bottom of the circle on the card base using strong sticky double sided tape. I then added the 2nd image onto the first. I attached the front panel and decorated it with the little bird from the stamp set and the Krafty dots. To make sure the ice oval didn't drop, I added a drop of clear drying glue under the oval on the string. I let this dry with the oval being flat so it would flip down when the card was opened.
I created an inside panel to match the front one as a plain white background was too stark. To get her to spin, you simply rotate her a few times and then close the card and tilt the ice as seen in the first picture above. When the recipient of the card opens it, she will do a beautiful pirouette!
Purples : BV08, BV17, V17, V15
Earth: E09, E08, E07
Cool Greys: C0, C1
Black Copic Multiliner SP size 0.35
Stamps : Kraftin' Kimmie Skating Friend, reverse stamp
Kraftin' Kimmie dots
Good morning and welcome to our
Monthly Saturday Challenge Mid Inspiration Post
This month the challenge themes for you are:
WINTER,
BLUE,
or
MONOCHROMATIC
You can choose any or all - whatever inspires you!
Krafty Girl Rosie is hosting the mid-inspiration post today!
One of the prompts for the group "There's A Stamp for That" in the current challenge is to use Otters. I used the adorable From the Other Side from Kraftin' Kimmie to make this fun mini slimline card.
I pulled out my mini slimline dies and cut out a panel. I used a stencil to create the water waves with Mermaid Lagoon Distress Oxide Ink. I used the same to blend in the water. I then created a mask and blended 3 different colours to create the sky(Fossilized Amber, Spiced Marmalade, Fired Brick). I love the way the sky came out! I stamped the sentiment directly on the background with Memento Tuxedo black ink.
I then coloured up the otters with Copics (E29, E27, E25, E23, E21, E49 for the nose), fussy cut them out and mounted them on the panel on foam pieces. I then used the next level of the mini slimline set to create the black mat and mounted it all on the card base. A relatively quick card but the colours are beautiful!
Ever make a project and think you can do better? That is how I felt when I made my original card using this set. I challenged myself to create using purple which is not a colour I use often. So over the last few weeks I have been thinking and Pinterest cruising and came up with a few more ideas. One was the fun Valentine I posted on Saturday and the next is this one:
It's time to hop on Instagram with Kraftin' Kimmie to celebrate the January 2023 Release!! After you leave here head on over to Instagram and start the hop at @kraftinkimmie or on my Instagram @janetanii.
I had an awesome time playing with the new Krafty Tools Layering Stencil! It can be used as a background or on its own as I did below:
Happy Hopping!
Woohoo!!!
Today we are celebrating all the new fabulous goodies in our January Release that are NOW available in the
So let's check everything out as we hop around the Krafty Design Team's blogs today! Grab a drink, sit back and relax while we take you on a krafty tour!
For today's project, I used the new Geo 1 stencil on my background and the adorable Krafty Mice! stamp set :
Happy Krafting!
PS. You can see everything up close in the Live Release Replay on Facebook!!
Today is our final day of Krafty Peeks for the January Release
by artist
Michelle Houghton called...
SO PUNNY!
This set is filled with adorable images and sweet puns - perfect to send to a friend anytime! And think about how cute they would be for Valentines Day!! 💓You can even add little faces for even more fun!
I made this monochromatic birthday card for my pun (and olive but not pimento) loving kiddo using the Olives and the "Olive you so much" sentiment.
Next, I made some Valentine's Day cards since I live with some pun lovin' guys:
You'll notice this awesome set coordinates with the YOU'RE A DOUGH-ABLE stamp of the month set!
The free stamp of the month needed one too!
Check out SO PUNNY in so many amazing creations today as you hop around the Krafty Team's blogs! You'll also see the beautiful new stencils, GEO 1 and KRAFTY TOOLS (a layering stencil!!) along the way!
Welcome back to Day TWO of our January Krafty Peeks!
Are you excited about what you've seen so far!? Are you ready for more?
I hope your answer was yes because we've got more fabulous fun for you today!
KRAFTY GOODNESS!
Check out KRAFTY GOODNESS and our new stencils in so many awesome creations today as you hop around the Krafty Team's blogs!
You'll see more of our January goodies all week, and then everything will be released after our LIVE Online Release Party on Saturday at 2 pm ET in the Krafty Friends facebook group!
*Be sure to join us for our Live Release Party as one lucky Facebook commenter will win Krafty $'s!!
Who's ready for lots of brand new Krafty goodies?!
on Saturday, January 14th at 2 pm EST in the Krafty Friends group!
*Be sure to join us for our Live Release Party as one lucky Facebook commenter will win Krafty $'s!!
Come on back tomorrow for some more krafty fun and goodness!
I saw this cool concept of making cards using your stash called "Sheetload of Cards" by Crafty Al. She has an awesome YouTube channel that you can check out here.
The January Sheetload of Cards project makes 8 mini slimline cards. You use a couple of pieces of designer series paper and then coordinating cardstock. Her instructions and video show you how to do all the cutting and assembly.
I decided to use the retired paper "All is Calm" from Stampin' Up. I chose my DSP and cut it out according to the instructions but when I went to assemble I didn't really like the 2 DSPs together. So, I cut out 2 more. You know where this is going right!?
So here are my 16 mini slimline cards I made:
I had a ball putting these together and I used a bunch of my stamps and dies which is one of my goals this year! I even made a few monochromatic cards for the Kraftin' Kimmie monthly challenge. I will admit that I really wanted to add some red or other colour! I used different types of sentiments - Christmas, winter, friendship, birthday. Snowflake paper can be used for anything!
#SUYSJan2023 #ShowUsYourSheetLoad #SheetLoadOfCards
Good morning and welcome to our new
Monthly Saturday Challenge
This month the challenge themes for you are:
WINTER,
BLUE,
or
MONOCHROMATIC
You can choose any or all - whatever inspires you!
Krafty Girl Brigitte is up first,
and we will be back later in the month with a mid-inspiration post!
Good morning Krafty Friends!
Happy New Year!
with Kraftin' Kimmie Stamps!
The theme of course is ANYTHING BUT A CARD!
Check out all the details from the Krafty Team below and be inspired to get skrappy!!